
The following tutorial will teach you how to build a whole-home IPTV DVR system.

One major drawback of using unverified IPTV services is the lack of recording capabilities. Even when recording live TV does work, there are two major limitations.
The first is lack of internal storage on most streaming devices. The popular Amazon Fire TV Stick only comes with 8GB and once all system apps are installed, we are left with only 4-5GB. That’s enough space for only one or two recordings.
The second problem is external storage on an Android-based device. Yes, Amazon Firesticks are powered by Android!
Sure, you can use an OTG cable to connect a USB drive but you can only record up to 4GB per recording on external storage.
Ever wonder why your recordings get cut off in IPTV players like TiviMate when trying to record to external storage?
In the video below, I will show you how to setup an IPTV DVR that all of your streaming devices can record to and play recordings from.
IPTV DVR Setup Video
Important Links Pertaining to Video
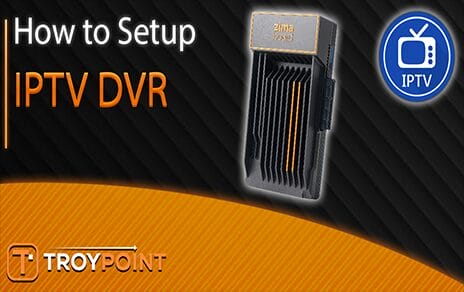
Why Choose ZimaBoard for Your IPTV DVR System?
The ZimaBoard 832 is a compact, energy-efficient mini-computer that can serve as the heart of your home network.

It allows for network-based recording, unlike USB-based solutions, enabling you to watch your recordings on any device, both at home and when you’re away.
Its small footprint means it uses very little electricity, making it an eco-friendly choice for your IPTV DVR setup.
One of the standout features of the ZimaBoard is its versatility. It supports dozens of useful apps, including Plex Media Server, which we’ll be using in this setup.
This flexibility allows you to create a customized IPTV DVR system that meets your specific needs.
IPTV DVR Setup Requirements
Hardware Setup
To get started, you’ll need to choose your storage solution. For this setup, we’re using a 2TB SSD drive with an adapter from the ZimaBoard website.
Surfshark VPN Exclusive Discount
Your online activity is monitored by your ISP, app/addon/IPTV devs, government, and all websites.
🔒 Become anonymous while streaming & downloading with Surfshark VPN
Save 87% with 24-Month Plan + Get 3 FREE Months
Use on Unlimited Devices & Share 1 Account with Entire Family
CLAIM DEAL HERE
Begin by connecting the SSD to the adapter, making sure to align the small tabs at the top properly. Once connected, plug the ZimaBoard into an available LAN port on your router and power it up.

Initial Configuration
Accessing your ZimaBoard is straightforward. Open a web browser and enter “casa.local” in the address bar. You’ll be prompted to create login credentials – be sure to choose a strong username and password combination.
After logging in, head to the Settings menu and update your system to ensure you have the latest CasaOS version.
Setting Up Storage
Next, you’ll need to add your external storage to the ZimaBoard. Navigate to the Storage Manager and create a new storage location.
Give your SSD a descriptive name, like “ssd1,” and then format the drive to prepare it for use with your IPTV DVR system.
Creating Folders
With your storage set up, it’s time to create the folder structure for your IPTV DVR. Access the file system through the CasaOS interface and navigate to your newly added SSD.
Create folders for your IPTV recordings, movies, TV shows, and any other media you plan to store. Remember to enable sharing for each folder to ensure easy access across your network.

Installing and Configuring Plex
Plex Media Server is a crucial component of our IPTV DVR setup. Install it from the App Store within CasaOS, then launch and follow the prompts to create or log into your Plex account.
Once logged in, you can start creating libraries for your movies, TV shows, and IPTV recordings.

Configuring Your IPTV DVR
The final step is to configure your IPTV DVR software to work with the ZimaBoard. First, you’ll need to find your ZimaBoard’s IP address using the terminal command “ifconfig -a”.
Make note of this IP address, as you’ll need it to set up a static IP in your router settings. This ensures consistent connectivity to your IPTV DVR.
On your Android TV device, open your IPTV app (such as TiviMate) and set up the recording folder to point to your ZimaBoard’s IPTV recordings folder.
This allows you to schedule and manage recordings directly from your TV interface.
Wrapping Up
Overall, setting up an IPTV DVR system with the ZimaBoard 832 offers a powerful, flexible solution for IPTV enthusiasts.
By following this guide, you’ve created a custom setup that allows you to record, store, and access your favorite IPTV content from anywhere.
Whether you’re a casual viewer or a dedicated cord-cutter, this system provides the tools you need to take control of your IPTV experience.
Frequently Asked Questions
Can I use a different storage option with the ZimaBoard?
Yes, the ZimaBoard supports various storage options, including USB drives. However, the SATA SSD option provides the best performance for an IPTV DVR system.
Is this IPTV DVR setup legal?
The legality of IPTV services can vary. Always ensure you have the right to record and store the content you’re accessing through your IPTV service.
Can I access my recordings when I’m away from home?
Yes, by using Plex Media Server, you can access your recordings from anywhere with an internet connection, provided you’ve set up remote access correctly.
How many simultaneous recordings can the ZimaBoard handle?
The number of simultaneous recordings depends on your IPTV service and network bandwidth. The ZimaBoard 832 is capable of handling multiple streams, but your specific limit may vary.
Do I need technical knowledge to set this up?
While some technical familiarity is helpful, this guide breaks down the process into manageable steps. With patience and attention to detail, even those with limited technical experience can set up this IPTV DVR system.
This page includes affiliate links where TROYPOINT may receive a commission at no extra cost to you. Many times, visitors will receive a discount due to the special arrangements made for our fans. Learn more on my Affiliate Disclaimer page.
Share this Post

Best VPN for IPTV in 2026 (Stream Live TV Anywhere)
iptv-uk.cloudHere are the Best Alternatives
iptv-uk.cloud

plusace24
Been sticking with plusace24 for a while now. They’re pretty consistent. Never had any issues so far. Thumbs up! plusace24